
How Does Java Really Work? Inside the JVM Architecture

Have you ever wondered what really happens when you run a Java program? How does Java go from the code you write to something your computer can actually run? And how does it manage to do all of this across different platforms with the same code? If so, you're in the right place.
Java’s power lies in the Java Virtual Machine (JVM), but before we get there, let’s take a quick look at the big picture: Java has the JDK (Java Development Kit) to compile your code. The JDK contains the JRE (Java Runtime Environment), and inside the JRE is the JVM—the heart of it all.
Imagine this as a container where everything works together. First, let’s visualize how all these parts fit:

At a very high level, when you write Java code, the JDK is responsible for compiling your program. The JDK has tools to convert your source code into something the JVM can understand and run. The JVM itself is the magical layer that runs Java code on any platform, maintaining the "write once, run anywhere" promise.
Now, let’s break this down step by step, and decode how each part of this process works, from writing code to running it on your machine.

Let’s break it all down into bite-sized pieces and dive deeper into each part of this fascinating architecture. Trust me, it’s not as complicated as it sounds!
1. The Java Development Kit (JDK)
Think of the JDK as the toolbox you use to write Java programs. It's where you get all the tools you need to create, compile, and run your Java applications. The JDK includes:
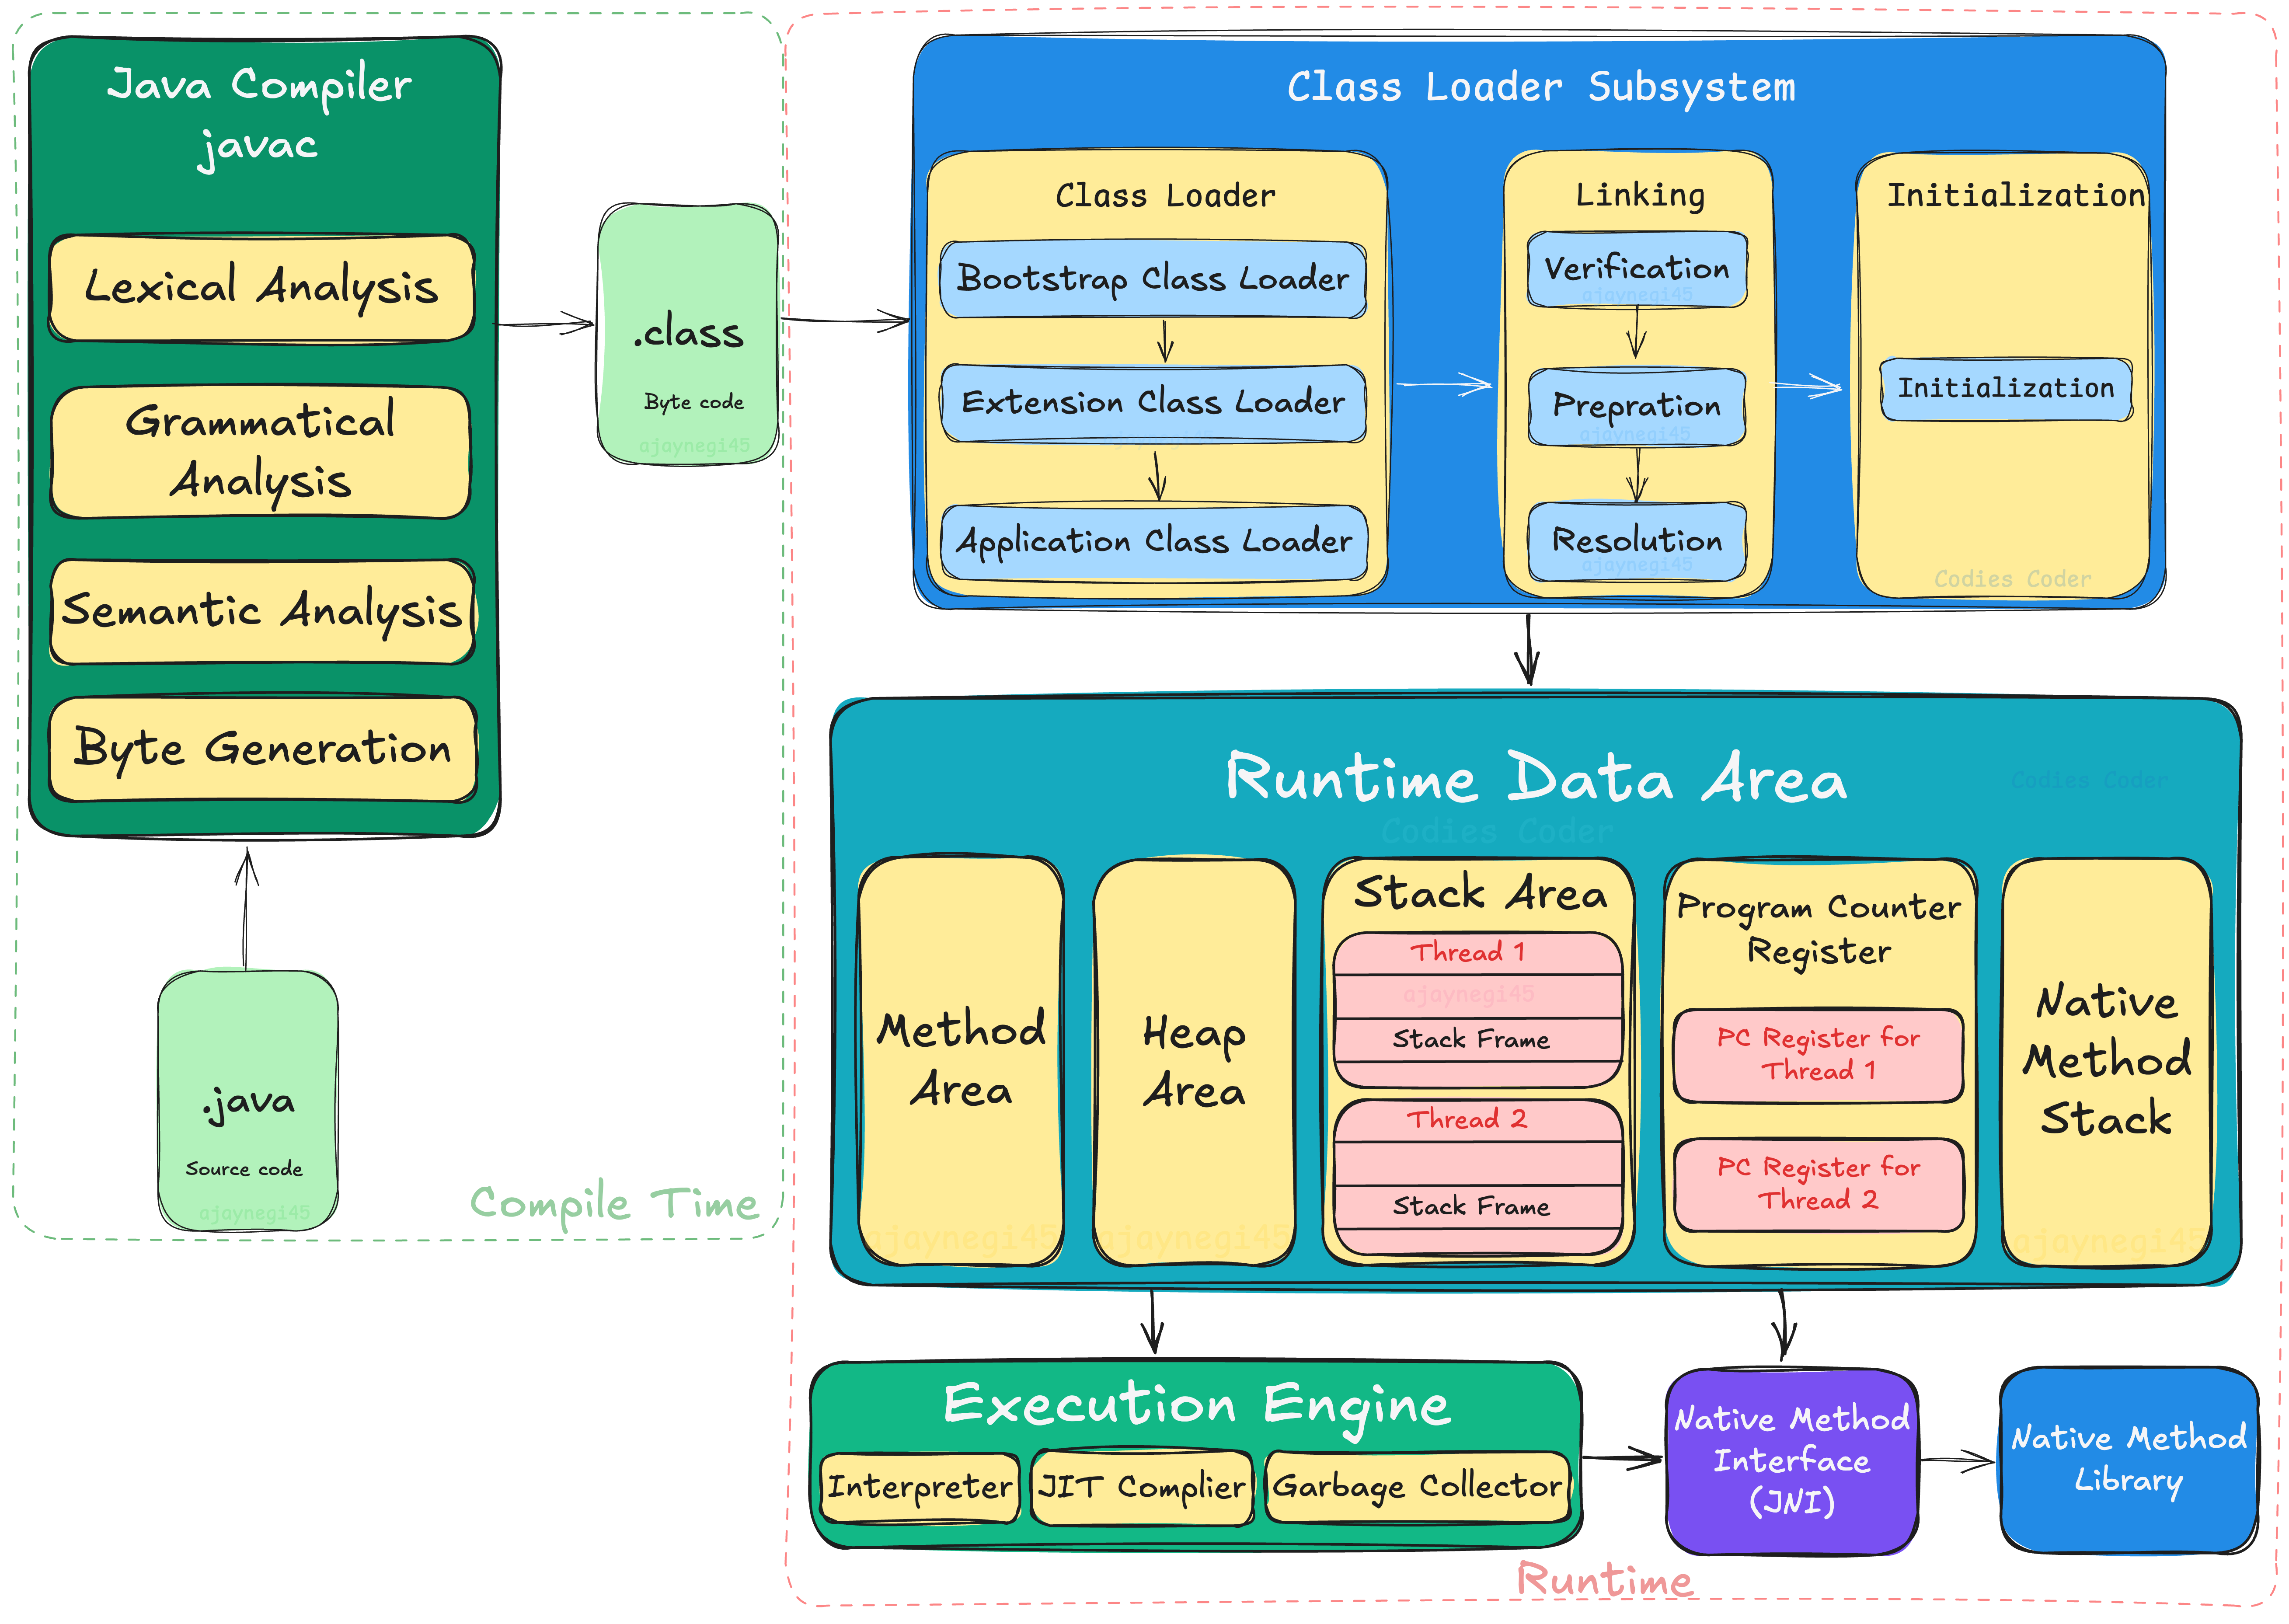
Compilers (javac): This is the tool that takes your human-readable (.java) files and compiles them into bytecode (.class) files. Bytecode is an intermediate, platform-independent form of code that can be executed by the JVM on any platform.
Libraries: Pre-written code that you can use in your projects. This includes everything from math functions to GUI components.
Debugging Tools: To help you find and fix issues in your code.
The JRE (Java Runtime Environment): As part of the JDK, this is what you need to run your programs once they’re compiled.
The JDK doesn't just help you write code; it’s also responsible for turning that code into something that can run on different devices and platforms.
")
In this diagram, you can see how the JDK sits at the top, with all its tools—compilers, libraries, and the JRE—working together to help you create Java programs.
2. The Java Runtime Environment (JRE)
Once you've written and compiled your code with the JDK, it's time for the JRE to step in. The JRE is a package of software that allows you to run Java programs on your system. It contains everything needed to run Java applications, including:
The Java Class Library: A collection of pre-written classes like (java.util.ArrayList or java.io.File) that provide a wide range of functionality.
Runtime Libraries: In Java 8 and earlier, all core Java libraries were bundled into a single file, rt.jar, which included everything from java.lang to java.util. This monolithic approach meant that even unused libraries were loaded, which could be inefficient. Starting with Java 9, Java introduced the modular system (JPMS), breaking the JDK into independent modules like java.base, java.sql, and java.desktop. This modularization allows for more efficient runtimes, as only the required modules are included, improving performance and reducing memory footprint. Tools like jlink let you build custom runtime images tailored to your application’s needs.
The JVM: The JVM is the heart of the JRE. It’s responsible for executing the compiled Java bytecode (
.classfiles). It abstracts away the details of the underlying hardware, ensuring that the same Java bytecode can run on different platforms without modification (this is why Java is known for its "Write Once, Run Anywhere" philosophy). The JVM handles memory management, garbage collection, and the execution of bytecode.
")
The JRE doesn’t provide the tools to develop Java programs (those are in the JDK), but it’s essential if you just want to run the programs that someone else has written. If you install Java on your system just to run a program (like a Java-based game or a web application), you’re typically installing the JRE.
3. The Java Virtual Machine (JVM) – The Heart of Java’s Portability
Here’s where things get really interesting. The JVM is the engine that runs Java programs. It’s responsible for interpreting the bytecode compiled by the JDK and executing it on your machine. The JVM is crucial because it allows Java to uphold its “write once, run anywhere” promise. But how does it do that?
Let’s break it down:
a) Java Bytecode – The Intermediate Code
When you write a Java program and compile it, the output is bytecode (a low-level, platform-independent code), not machine code (which is specific to your computer's processor). This bytecode is what makes Java portable—it can be executed on any device that has a JVM. You don’t need to rewrite or recompile your code for different platforms. Here’s why:
Bytecode: Think of bytecode as a universal language. It’s like a code that doesn't belong to any specific machine. You can run it anywhere, and the JVM on that system will translate it into something the machine understands.
.class Files: When you compile your Java program, the output is a
.classfile, which contains the bytecode. The JVM reads this bytecode and converts it into machine code to execute on your computer.
This is how Java can run on virtually any device, whether it’s a Windows PC, a Linux server, or even your smartphone.
b) Class Loaders – Bringing Classes into Memory
The JVM works by loading classes (or parts of the bytecode) into memory as needed. When you run a Java program, the JVM uses class loaders to find and load the necessary .class files into memory area.
The Class Loader mechanism consists of three main steps as follows:
Step 1: Class Loading
When a class is first referenced in a program, the JVM's Class Loader kicks in to load the class file into memory. This process follows a strict hierarchy of class loaders:
Bootstrap Class Loader: This is responsible for loading the core Java libraries (like java.lang.*). Before Java 8, it loaded classes from the rt.jar file, but from Java 8 onwards, it loads the java.base module as part of the new module system. This loader has the highest priority and is built into the JVM, so it can’t be customized or replaced.
Extension Class Loader: This loads Java extension libraries (for example, javax.*). Before Java 8, it loaded classes from the lib/ext directory, but starting with Java 8, it now loads platform-specific modules (like java.sql, java.desktop) for backward compatibility. This loader has the second-highest priority and provides additional functionality beyond core Java.
Application Class Loader: This loads the classes for your own Java applications, including classes from your project and any external libraries specified in the classpath (like .jar files). It’s the class loader you interact with most often when running Java programs. This loader is the lowest priority in the hierarchy, so it loads classes only after the Bootstrap and Extension Class Loaders have been checked.
Each class loader operates in a parent-child relationship, and if a class loader cannot find a class, it delegates the task to its parent class loader. An object of this class is created in heap

Step 2: Linking
Once a class is loaded, it's linked into the JVM. Linking is a multi-stage process that prepares the class for use:
Verification: Ensures that the bytecode is valid and adheres to the JVM's specification. This step checks that the bytecode does not violate any rules that might make it unsafe to execute (such as accessing memory in unauthorized ways). If the bytecode doesn't pass verification, the JVM throws a VerifyError.
Preparation: This step allocates memory for static variables and initializes them to their default values (like null for objects, 0 for integers, etc.). It doesn't assign the values specified in the source code—just the defaults. If there are issues here, like trying to allocate memory for invalid static variables, the JVM might throw a NoClassDefFoundError or NullPointerException, depending on the nature of the problem.
Resolution: This stage resolves symbolic references (like class or method names) into actual references to memory locations. For example, if a class calls a method in another class, the JVM resolves the method reference and links it to the actual method's memory address. This ensures that when the class is actually executed, all method calls and references are mapped correctly. If a symbolic reference cannot be resolved (for example, if a method or class is not found), the JVM may throw a NoSuchMethodError or ClassNotFoundException.
If any issues are found during the Verification stage, the JVM will throw an exception to stop the class from being used. This ensures that your program won't run with faulty or malicious code. For example, if a class file is altered or corrupted—perhaps by malware or a malicious actor—the JVM’s bytecode verifier can detect these changes. If it finds something suspicious or unsafe, it will throw a VerifyError (also known as a 'verify exception'). This exception helps prevent the execution of compromised or harmful code, safeguarding your application and system.
Step 3: Initialization
Initialization is the final step before a class is ready to be used in your program. Imagine you’ve bought a new piece of furniture—before you can sit on it, it needs to be assembled and positioned in your living room. Similarly, initialization is where the class gets "assembled" and its parts (variables, static blocks) are set up.
It’s the moment when Java makes sure everything inside the class is properly initialized and ready for action. But what exactly happens in this step?
Assigns Values to Static Variables: Static variables are shared by all instances of a class, so they need to be set up before anything else. During initialization, Java assigns them the actual values defined in the class.
Executes Static Blocks: If your class contains a static block (a special piece of code inside static
{}), it gets executed now. Static blocks run only once, the first time the class is accessed. This is where you can set up things that need to be done just once—like initializing complex static variables or connecting to a database.Assigns Values to Instance Variables: While instance variables are assigned default values during class loading (e.g., null, 0, etc.), this is the point where they get their real values, either from the constructor or from any static blocks that are part of the class.
Java doesn’t just initialize a class randomly—it waits until you actually use it. Here are the six situations that trigger class initialization:
Using the new Keyword
Calling a Static Method
Assigning a Value to Static Fields
Explicit Class Initialization
Using Reflection
Creating an Instance of a Subclass
c) Runtime Data Area – The Brain of the JVM
When you run a Java program, the Runtime Data Area is where all the important data lives during the execution of your program. It’s like the workspace of the JVM, where it holds the data and provides resources that your program needs.

This area is divided into five main parts, each serving a specific purpose.
1. Method Area: Where Class-Level Information Lives
The Method Area is a shared resource across all threads in the JVM. It holds important information about the class, including:
Class-level metadata (class name, superclass, etc.)
Method and field data (method names, parameter types, return types, etc.)
Runtime Constant Pool (constants, literals, references to other classes or methods)
Constructors and method bytecodes (for both instance and static methods)
Since the Method Area is shared among all threads, it’s critical to manage it carefully to avoid memory contention or leaks. If the JVM can't allocate memory here due to excessive class loading or other factors, it throws an OutOfMemoryError.
2. Heap Area: The Home for Objects
The Heap Area is shared across all threads and serves as the runtime data area from which memory for all class instances and arrays is allocated.
The JVM uses an automatic garbage collector to manage memory in the heap. The garbage collector reclaims memory used by objects that are no longer needed, ensuring that your application doesn’t run out of memory.
Key things to note:
The Heap can be dynamically resized during runtime based on the application's needs. However, if the JVM can't allocate sufficient memory, it throws an OutOfMemoryError.
Heap memory can be managed with various garbage collection strategies, like Mark-and-Sweep, Generational GC, etc., to optimize performance.
3. Stack Area: The Thread’s Personal Workspace
Each thread in the JVM gets its own Stack Area. The stack is crucial for managing method invocations and local variables, and it uses a Last-In-First-Out (LIFO) structure to store data.
Key parts of the Stack Area:
Stack Frames: Each method invocation creates a stack frame. This frame stores:
Local variables
Operand stack (used for intermediate computations)
Frame data (method data, exception handling info, etc.)
The Stack is thread-safe because each thread has its own stack. However, if a thread’s stack grows too large (for example, due to deep recursion), the JVM will throw a StackOverflowError. If the system can’t allocate enough memory for a new stack, it will throw an OutOfMemoryError.
4. Program Counter (PC) Register: The Instruction Pointer
Each thread in the JVM has its own Program Counter (PC) Register, which holds the address of the currently executing instruction. The JVM uses this to fetch the next instruction to execute.
For native methods, the PC Register’s value is undefined, as native methods are executed outside of the JVM’s bytecode.
The PC Register is critical for managing the execution flow in multithreaded programs and ensures that each thread maintains its own execution context.
5. Native Method Stack: Supporting Native Code
The Native Method Stack is used for managing native method invocations, which are methods written in languages like C or C++. Each thread gets a separate stack for native method calls.
Native methods are often used for performance optimizations or low-level system interactions (such as file I/O or network communication).
This stack stores all the information related to the native method call, and it interacts with the JVM stack for managing data between Java and native code.
d) The Execution Engine – Running Bytecode
Once the bytecode is loaded into memory, the execution engine kicks in. It’s responsible for reading and executing the bytecode instructions one by one. The JVM uses three main methods to do this:
")
Interpretation: The JVM reads and executes the bytecode line by line, which is efficient for small programs but can be slow for large, complex applications.
Just-In-Time (JIT) Compilation: To boost performance, the JVM uses JIT compilers. The JVM tracks which methods are called frequently (hotspots). Once a method reaches a threshold of calls, the JIT compiler compiles it into machine code. This allows future calls to execute faster without needing interpretation. Some JIT compilers can re-optimize code if methods continue to be called frequently, ensuring further performance gains. Those methods that are repeated, JIT provides direct machine code, so re-interpretation is not required.
Garbage Collection: One of the most significant features of the JVM is automatic memory management. In many languages, you need to manually allocate and free memory, which can lead to memory leaks and bugs. In Java, however, the JVM takes care of this for you using garbage collection. Garbage collection is the process where the JVM automatically identifies and removes objects from memory that are no longer in use, freeing up resources without you having to worry about it. It makes Java easier to work with, especially for beginners, because you don’t need to manually manage memory allocation.
e) Java Native Interface (JNI)
Function: Allows Java to interact with native code (e.g., C/C++ libraries) for tasks that require direct hardware access or OS-specific operations.
How it works: JNI acts as a bridge, letting Java call native libraries and vice versa.
Why it matters: JNI is crucial for performance-critical operations, such as optimizing I/O or using existing system libraries, but it introduces complexity as Java loses its cross-platform advantage when using native code.
f) Native Method Libraries
Function: Collections of native code (C/C++) required by the JVM for interacting with lower-level system resources.
How it works: These libraries are accessed via JNI, allowing the JVM to utilize OS-specific functionality, hardware operations, or external libraries.
Platform Independence – The Magic of the JVM
The JVM is what enables Java’s famous "write once, run anywhere" feature. Since the JVM exists for every major operating system (Windows, macOS, Linux, etc.), the same Java bytecode can be executed on any platform without modification. The JVM abstracts away the underlying hardware and operating system, meaning that Java code can run on any device or server as long as the appropriate JVM is available.
Final Thoughts
Java’s architecture may seem complex at first, but once you break it down, it’s a beautifully engineered system designed to run code efficiently across different platforms. The combination of the JDK, JRE, and JVM allows Java to be both powerful and portable. As you write and run Java code, remember that you’re taking advantage of a well-oiled machine—one that has been refined over decades to ensure consistency and reliability.
So next time you write some Java code, you’ll know exactly what’s happening under the hood: how the JDK compiles your program, how the JRE gets it ready to run, and how the JVM executes it seamlessly across platforms. Pretty cool, right?
Happy coding, and remember: Java’s "write once, run anywhere" mantra isn’t just a slogan—it’s the magic of the JVM in action.
Do you know someone who loves engineering or has a curiosity for tech? 🤔
Why not share the joy of simplifying complex ideas with them? Forward this newsletter and spread the knowledge—learning is always better when it’s shared! 🚀